
Table of Contents
Text Editor
Basic Controls
Context Menu (Ctrl + RMB) - Many things that you add into the text editor—such as tables—can be hovered over. By pressing Ctrl + Right Click while hovering, a menu will open, allowing you to edit elements on the fly rather than restarting from scratch.
- Keyboard shortcuts are functional for items such as bold, underline, and italic text.
- Buttons

-
Bold
-
Starting typing with bold:
-
Click the B button to start typing in bold
-
-
Adding/Removing Bold from text
-
Select desired text and click B to add or remove bold from text
-
-
Starting typing with bold:
-
Italic
-
Starting typing with italicized text
-
Click the I button [include snip image] to start typing in italics
-
-
Adding/Removing italics from text
-
Select desired text and click I to add or remove italics from text
-
-
-
Underline
-
Starting typing with underline
-
Click the u button [include snip image] to start typing with text underlined
-
-
Adding/Removing Underlines from text
-
Select desired text and click u to add or remove underlines from text
-
-
-
Fonts
-
Adding/Changing - The button labeled “Font” allows you to select some of the more basic fonts. You can highlight over text and change it with the font button, or select your font and type in it going forward.
-
Additionally, the text editor DOES support custom fonts in that you can copy and paste things from your own word editing software, and it will maintain those fonts. This means that if you have an obscure, or even homemade font, you can simply copy, paste, and the integrity of the font will be maintained. It can subsequently be bolded, changed size, or otherwise modified within the editor.
-
-
Text Color
-
The text editor includes a color palette. Highlight your text and click the A with a color line under it, and you can select a color you wish to change it to. You can also simply choose a color and type in the color desired. While standard colors are in the quick menu, you can additionally click “More colors” You can additionally type in your color desired in hex code format.
-
-
Highlight Color
-
This functions exactly the same as the text color button, however it highlights your text in the selected color, rather than changing the color of the text itself.
-
-
Text Alignment (Left/Center/Right)
-
Left align forces text to the left side of the editor (or table cell).
-
Center align centers the text between the two outer limits of the editor or (or table cell).
-
Right align makes text go to the right side of the editor.
-
-
Clear Formatting
-
The clear formatting button will clear all formatting from selected text.

-
Emoji
-
Emoji may be selected in a few ways.
- Using the button which pulls up a menu.
- Using your mobile keyboard if posting on mobile.
- Using colons to bring up a quick select as you type (like in Discord).

Hyperlinks
-
Adding - The “Link” button allows you to insert a hyperlink, such as to thematic music for your post. On top goes the link itself, such as www.myth-weavers.com. On bottom goes the text you wish to display, such as “The Original Website.”
-
Once posted into the editor, these hyperlinks can additionally be edited like any other text - changing the font, size, or color.
-
Context Menu - ctrl+right click will allow you to edit or remove the link.
Images
-
Adding an image
-
In the lower right hand corner of a text editor box, you will see an “Other Media” button. This is how you attach images into your post. Click this button, and you will see two options.
-
There are two ways to insert an image - either from a URL or from an attachment you have previously uploaded. Attachments are global, which means that if you use the same character portrait in fifty games, you only need to upload it once. Attachment limit of 1MB, however the current error message if the image is too large is “an unknown server error occurred when uploading this file.”
-
Images AUTOSCALE TO DEVICE. They will post at the largest size possible for the media, and then the devices can be clicked to be pinchable to zoom in further. What this means is that a large image on a cell phone screen, for example, will be scaled to fit the cell phone screen - but you can open the image independently and zoom in on it.
-
Context Menu Options - Ctrl + Right clicking an image will allow you to change its title (think in terms of a text reader here), its size, and its alignment (left / center / right)
-
Tables
-
Adding a table
-
Tables are the devil’s sorcery. However, if you so desire to add one, click the little button on the right of the text editor options that says “Tables.” You’ll get a picture that looks like this:
- There are context menus for where you want to place headers, and how you want text aligned.
- Tables will look REALLY STRANGE as you start to fill them in, as it auto-spaces everything as you go. However, you can edit this later.
-
Modifying a table
- Copying and Pasting - You can easily select someone else’s table, copy, and paste it. This will create a NEW TABLE that you can modify just like a table you created yourself.
- Context Menu - If you select your table and ctrl-right click, you will open up a whole new context menu. You can add cells, rows, or columns. You can go back into the table properties and change its alignment. You can change spacing.
- Nested Tables - Yes, you can nest tables. Go into the cell you want to add another table, and click that table button! The context menu remains the same.
- Deleting Tables - Maybe your table was an exercise in folly. Select the whole table, ctrl-right click, and click delete table. Voila, it has disappeared faster than beer in a barbarian’s stein.
- Table width can be done as PIXELS, which might read as "500px" or PERCENT, which might read as "50%" The latter is helpful for scaling across different devices.
- By using the SOURCE code feature, you can get even more fancy with tables. For example, if your table has the line style="width:100%;" you can set a maximum width (which is nice for desktop users) by changing it to style="max-width:900px;width:100%;"
-
Tables are the devil’s sorcery. However, if you so desire to add one, click the little button on the right of the text editor options that says “Tables.” You’ll get a picture that looks like this:

Fieldsets
-
Adding a fieldset
- In the text editor, you will see a little button next to the OOC button that says “Fieldsets” when you hover over it. Click that. There are two text fields - “Title” and “Content.” The Title is the top text, where you might put something like who is speaking. The content is eponymous. Yes, you can put pictures in your fieldset content. If they don’t go in when you add it to your post, you can click and drag the picture to where you want it.
- Can you add pictures to the title box? YES! However you may need to click and drag it into position.
- Can you nest fieldsets? YES! This is very intuitive, and I have every faith in your abilities to click the fieldset box a second time. However, you can not nest fieldsets inside the title box.
- Modifying - Simply clicking the edit button will allow you to edit fieldsets as desired. If you have nested fieldsets, you can click and drag them to move them around, however, they cannot change “levels.” The outermost fieldset must remain the outermost. However, if you have three fieldsets within that fieldset, they can be re-arranged freely.
OOC
- Click the OOC button to create an OOC item in your editor. Two fields are listed - “Shown Text” is what is shown before clicking the item. The “Hidden Text” is what will display to everyone after they click the OOC item.
-
OOC items can be used in-line in your post. They can ONLY have text in the “hidden text.”
- Ctrl-Double Left Click allows you to edit OOC after it has been posted.
Spoilers
- Spoilers function very similar to OOC, however they cannot be used in-line in your post. They are solely “out of text” objects. However, they have the benefit that you can edit what is displayed by the spoiler more freely, using bold, italics, links, quotes, and add pictures. You can also nest spoilers, but that would fall under “Chaotic Evil.”
- Modifying is done simply by clicking the edit button. It automatically displays both the display text and the spoilered content.
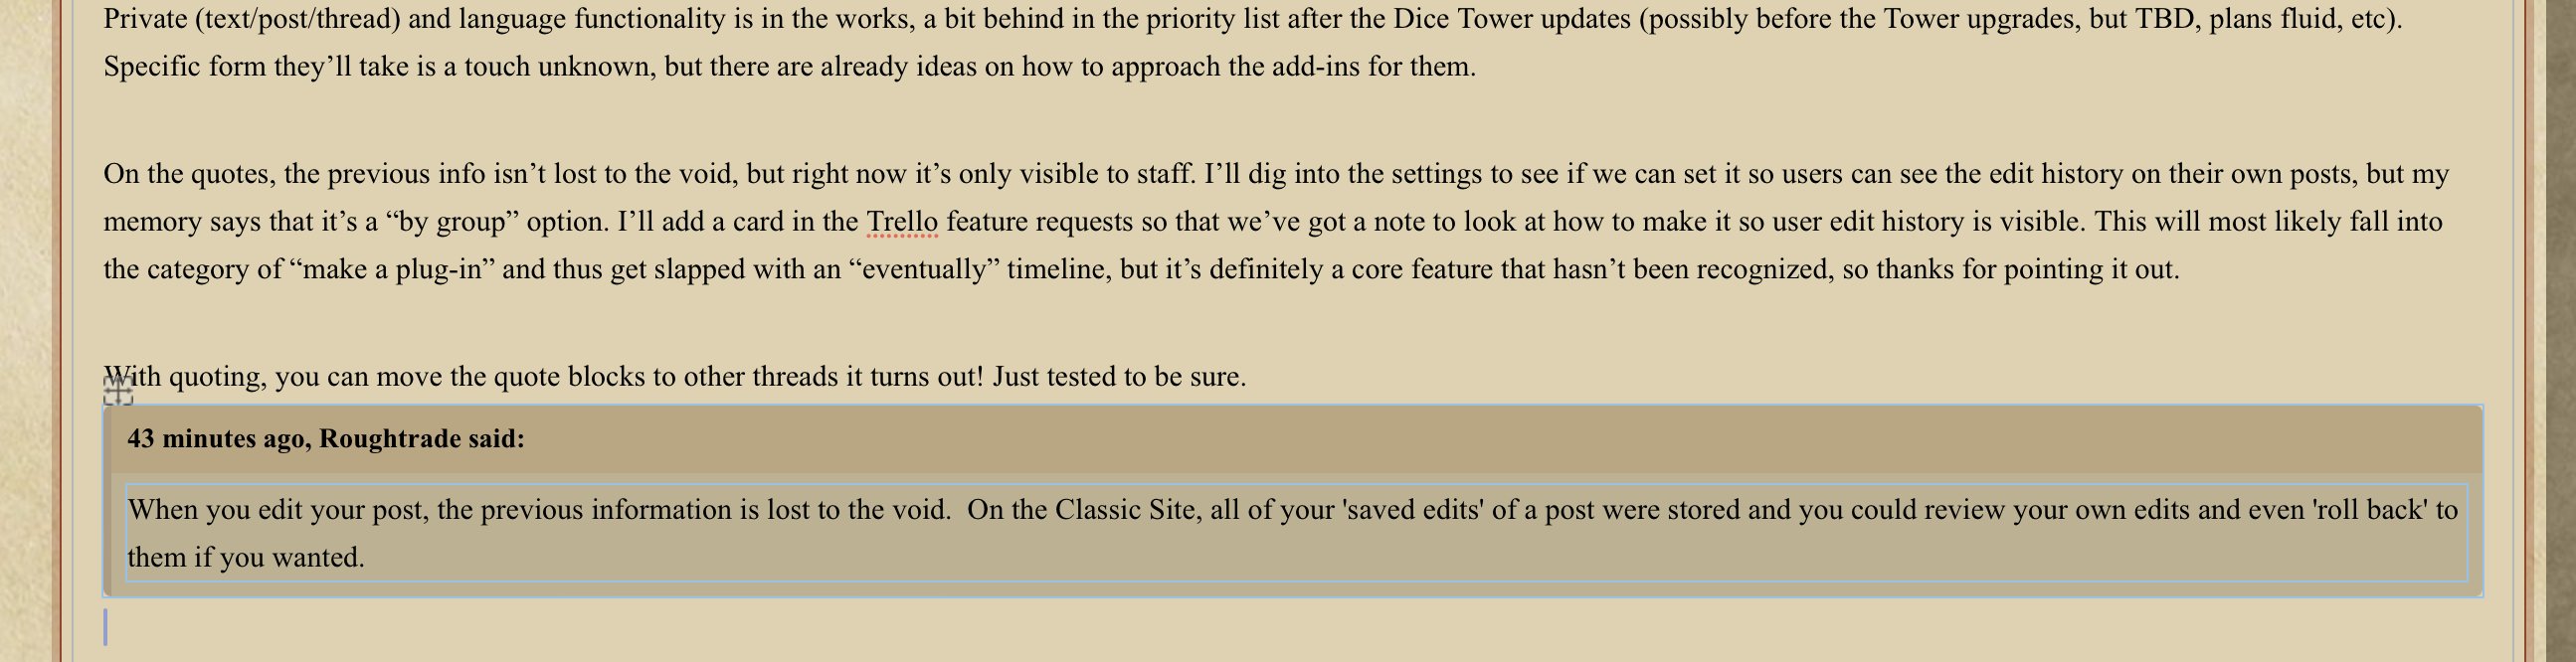
Quotes
There are two ways to create quotes on Myth-Weavers, full post quotes and selecting desired text.
-
Creating complete post quotes:
- Click on the quote button at the bottom of the desired post, and it will create a quote block in the text editor for your new post.

-
Create a partial post quote:
- Select the desired text and a “Quote Selection” button will appear. When you click that button, the selected text will be created in a quote block in the text editor.

-
Copying a quote to another thread:
- Click on the title bar of the quote block in the editor to select it, and use Ctrl + C (Or Cmd + C on Mac) to copy the quote block.
-
- Go to the desired thread, into the text editor, and use Ctrl + V (Or Cmd + V on Mac) to paste the block in the text editor in the desired thread.
-

Note: ctrl + shift + v is "paste and match target formatting." Some browsers have it as a right click option as well.
Game Forums
- Navigating to the games list is done through Browse > Games

- Sorting the games list is done via the sort button in the top right.

- Filtering allows you to sort by system and advertising status.

-
Making a game
- The home page is “Browse” -> “Forums.” Games are not created here. Please do not click “Start a new topic” in order to create a game. INSTEAD! Under browse, click “Games.” In the upper left, you will see “Start a Game.” Click it.
- A menu will open, it has the following options:
- Name - Pick something compelling.
-
Privacy Settings - As described under each option. This option can be changed later by the owner/GM as needed.
- Read-Only: Everyone can see the game and its posts, but only members can participate. Users need to be invited by a Game Master to join.
- Description - This is what is shown to people on the Advertisements page, however this is a short blurb, as the advertisements is in tile format.
- Game Icon - This picture is the icon that goes with the game. The banner image can be changed once the game is created from the game’s individual forum.
- Game System - The system you will be running the game in.
- Advertising - Whether or not this game will be listed in the “Advertisements” section. This can be edited in the game forum itself under “Manage Game” -> “Edit Game Settings.”
- Who can see who is in this game - This allows you to create more layers of subterfuge. Perhaps not all players know who is in the game!
- Game Rules - This is a fully editable rules section which you can use to have people read before they are allowed to join the game, much like a “Terms of Service” for a website. You can force people to acknowledge them before joining, and force people to re-acknowledge them before participating further.
-
Once in the game forum, you can add tabs to your game:
1. Your newly created game will have two items on the navigation bar: Overview and Members. But it will not have anywhere to actually play-by-post. You have to create that item/tab (a "game forum" called "topics" by our current software).
2. To create a forum for topics/threads, find "Manage Game" on the navigation bar. Click down to "Topics" under "Add Game Feature."
3. You can then name your forum (required), give it a description, and set your privacy preferences (These allow the GM/players to create their own private threads). Click "Save" when you are done. You now have a game forum to create threads/topics in to play your game.
4. To create individual topics within the forum to play your game (a topic for in-game posts, a topic for out-of-character discussion, etc.), find the "Start new topic" button near the top of the game page. Each topic will need a title. Options for the Topic are on the menu next to the post (Lock, Pin, Hide, etc.). The Submit Topic button is at the bottom of the post.Other tabs available in games:
- Calendar - This tab allows you to set dates for certain things. For example, perhaps there are post reminders you want to set, or perhaps there are live Discord sessions that you run parallel once a month.
- Blogs - This is just like creating a blog. You can make posts in it, and people can comment on them. You can enable RSS feeds for your blog as well.
- Files - You can create a section for the uploading and downloading of files for your game—PDFs for setting information, photos, music, etc.
- Sheets - This creates a tab to hold Myth-Weaver sheets for your game. Currently, they are added by numeric value.Notes:
1. Overview and Members cannot be edited or deleted, but they can be moved around on the navigation bar.
2. Whichever item is first on the navigation bar is the default item that opens when you click on your game. So, if you want to go straight to your game forum when you view your game, move your newly created topics tab to the front of the list. (Find "Manage Game" on the navigation bar. Click down to "Reorder Menu," and then drag and drop the items into your desired order).
3. You can have multiple tabs of the same type in a game, allowing you to organize your game into many different sections. -
Advertising a game
The advertisements page itself shows any games where the GM has set the Advertising date in the future. As with OGMW, there is a filter sidebar that can be used to narrow down the results to a specific game system.
For GMs, all you need to do to advertise your game is select Manage Game > Edit Game Settings, and put the end date in the Advertising field. Doing so automatically sets your game's privacy status to Public, allowing applicants to post without joining.

The privacy status will automatically change to Closed when the Advertising date passes; you can then send join invitations and, as desired, use the Edit Game Settings panel to change it to Private or Read-Only.
-
Joining a game
- There are two ways to join a game. 1) From the “Advertisements” tab, you will see a list of all currently advertising games. You can sort the games in a variety of ways, and you can toggle between "list" and "grid" view for ease of browsing. 2) From the “Games” tab, you will see a list of all games on the site, including ones you are able to join.
- Your games joined are shown on the left.
-
Following a game
On the left side of the page, under the My Games list, you will see the My Followed Games list (if you are following any games).
- The My Games list is the list of games that you are a member of.
- The My Followed Games list is a list of games that you are following but are not necessarily a member of.
Myth-Weavers allows you to follow various types of content on the site. You can follow many of the "tabs" within a game forum, and you can follow individual topics. Use the "Follow" button on the top right side of the content you wish to follow and select your notification preferences related to that content. Followed content can also be managed within your account (click on your username in the top right corner of the page and select "managed followed content").
If you want a game to show up in your My Followed Games list, you must follow the "Overview" tab of the game you wish to appear on that list. Even if you are following other content within that game, the game will not show on the My Followed Games list unless you follow the "Overview" tab within that game. Consequently, if you want to "unfollow" a game and remove it from the My Followed Games list, you must unfollow the "Overview" tab within that game.
Also note: since all of the post, topics, etc. aggregate to the Overview tab, once you follow the Overview tab, you will essentially be following all follow-able content in the game.
-
Archiving a Game
Game Masters can archive games when they're no longer needed. Simply go to Manage Game > Edit Game Settings, and select Archived as the Privacy setting.

You can find archived games from the Games menu up top:

Tutorial for copying/pasting quoted post on Myth-Weavers (MW to MW)
Original Write Up by @bwatford
EDITOR'S NOTE: The Clone button is a more convenient method and its use is recommended!
1. Find a post that you need to copy and edit for your own purposes or desire to use their post as a template for your own.
2. At the bottom of that post hit the "quote" button to quote it in a new post.
3. When you hover over the quote with your mouse a small box like in the picture below will be seen in the top left corner of the quote.

4. While holding the CTRL key, right click that square and it will give you some more options as in the below picture. Select remove quote but keep contents and it will remove the quote from around the quoted post.

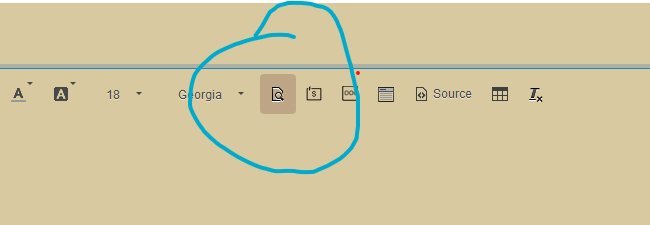
5. Once that is done click on the button that says "Source" in the editor menu. This will open up a box with a bunch of code in it. Copy the contents of this box by selecting it all with your mouse and hit copy.
6. Open up a new message wherever you desire the contents to be copied to, click the "Source" button in the new message and paste the code you got from the quoted message into the code box. Click Ok.
6. Your new message should now look exactly like what you copied, and you can edit it normally at this time.
7. Save message when done.
Migration Guide (OG to MW)
Original Write Up by @bwatford
If you are trying to import stuff from original Myth-Weavers to the new Myth-Weavers you can do so by copy/paste.
-
Just select the entire post with your mouse and click copy. (As you see it on Old MW, not the bbcode)
-
Come over to a new thread on Myth-Weavers and click paste. It will look all wonky, white background behind lettering, etc. Now just select "paste as plain text at the bottom of the message where it pops up after you paste. This will post the new content in plain text while keeping your line-breaks, etc..
-
Then you will need to reformat it on the new site using the posting editor. That way your post is assured to look right under the new site and on all devices and themes.
-
Now insert any images by first going to the old MW site and right click on the image and use "Copy Image Link".
5. Now come back over to the new message, place your cursor where you want the image and use the bottom right "Other Media" button to select Insert Image from URL
You can double click the image or Ctrl-Right Click to get options to float an image left or right or to resize the image to your liking.
6. Save your new post.


Warning: If you try to keep formatting from the old MW copy/paste it will have issues on the new site as it handles a lot of things differently to account for screen size (mobile, tablet, & desktop) as well as themes. When in doubt use the preview button to see how your post looks on different devices. You also can change themes at the bottom of the page to see how your post looks in different themes. (Note, please save your post first before changing themes or you will lose it. Yep, I learned the hard way.) It is always best t just copy/paste plain text only and reformat with the new editor.
Things of Note:
OOC/Spoiler/Private tags will not come over in the copy/paste. You will need to copy those over and create them where needed. This is because the new site handles their creation much differently than bbcode did.
It sounds complicated but it really is not, and much faster than you think it would be after you do it a couple of times.
Best practices I have found so far:
Text
- Never select black as a color for text. Use (Default) so that it properly changes with the theme that the user is using so it doesn't wash out on the dark theme.
Images
- Images that are going to be floated are best set to 150px as we have a little less width to work with due to having the die roller on the right. If someone wants to see a larger version all they have to do is click the image in Myth-Weavers.
- Images that are to be centered by themselves (no float) and you don't want full size is best at 300px as they show well on both desktop and mobile.
- If you need a picture to be full size, don't set a size at all and Myth-Weavers will always size the picture to the maximum width available.
Font Sizes (these seem to work best across multiple devices)
- Headers I set to 24
- Sub Headers to 18
- Text to default size
The above guide is not perfect, it is, as said. A down and dirty version. I am sure someone will do a much better version as time allows and more users get used to the format.
Changing Topic Titles
Changing the title of a topic (thread) is accomplished by editing the first post in the topic.

Editing the first post in a topic gives users access to all of the topic options available upon topic creation (adding a poll, adding tags, etc.).

It's also possible to change the Topic Title from the list view using "click-and-hold" (or long-press on mobile) over the thread title.
Thread Prefixes and Tags
Myth-Weavers supports both "tags" (labels that go after topic titles) and "thread prefixes" (labels that go before topic titles).

- To add a tag or a prefix:
"Start New Topic" (to create a new topic) or view the topic you want to add a tag or prefix to.
In the top left of the post window, look for "Add Tag." Click that.

In the box labeled "Tag" type the name of the tag or prefix you wish to create.

Then, if you wish it to be a tag (placed at the end of the post title), click "Save."

If you wish it to be a thread prefix (placed at the beginning of the post title), select the thread prefix that will appear in a drop-down just beneath the box you typed it in. Then another drop-down will appear that says "Item prefix" (note: this text is currently unreadable in the default and dark themes) and "None." Click on the down carrot after "None" to select your thread prefix and then save.


- To Delete a tag or a prefix:
You can delete any tag by viewing the topic that is tagged and clicking the tiny "x" beside the tag.

You can delete any prefix by viewing the topic that is prefixed, clicking "Add Tag," and then clicking the tiny "x" beside the prefix, then "Save."

Posting in Games
Post Design - Best Practices for Multiple Screen Sizes
Myth-Weavers love to format their posts to include images, tables, and other complex layouts. The old site did not accommodate different window sizes, so posters could be fairly confident that their readers would see pretty much exactly what they saw. The new site, however, does accommodate multiple screen sizes, creating new challenges for complex post formatting.
Posters cannot accommodate for every resolution somebody might view the post in. Posters have no way of knowing what sort of screen their readers are viewing from. (This has been a web design challenge for decades.) Posters can no longer rely on a static content area as a reliable space for post designs. There are way too many possible resolutions and aspect ratios to account for. Posters can, however, make some reasonable accommodations, but they shouldn't sweat the multi-format chaos. Likewise, readers are going to have to withhold judgement about the looks of a person's post format if it happens to be odd. Readers may not be looking at the post with the window size the post creator intended it to be viewed with.
Some Practical Tips
The "Preview" button on the UI is quite robust, and it gives an estimate of what a post looks like in a different size.
Additionally, it may become best practice around here for GMs (or every poster) to include a "best viewed at...X resolution" or "best viewed on mobile", etc. footnote in game ads and in posts, especially those users who may be regularly working on screens that are much larger or smaller than the average person. It gives a post the best possible chance of having others appreciate it the way it's meant to be viewed.
And on that note, many users find that 1920 x 1080 is a common enough resolution that if a poster is really concerned about viewing consistency, then that's the target to shoot for designing around. It's not too bad on mobile, either.
Private Text Features
There are two ways for members of a game to make some of their posted material private or hidden:
- A GM or Player can make a topic private so that 1) only certain people can see the topic or 2) only certain people can't see the topic.
- A GM or Player can make a block of text private so that 1) only certain people can see the block of text or 2) only certain people can't see the block of text.
Make a Topic Private
A GM or Player can make a topic private so that 1) only certain people can see the topic or 2) only certain people can't see the topic.
When you create or edit a topic (thread), you'll have the option to specify members who can or can't see that topic. The options are at the bottom of the form. (Note: to edit an existing topic in this way, you have to edit the first post in the topic.)

The first "Choose Member(S)" is "Show for." This hides the topic from every user except the ones listed here. The second "Choose Member(S)" is "Hide from." This hides the topic only from the listed users (and those who are logged out).

Private topics are automatically respected in all views, including lists, threads, and streams, regardless of whether it's in a game or not. The following people always can see the item regardless of the values picked:
- The author themselves
- Within a game, any game masters or co-GMs
- Site staff, unless the content is within a game in which they are a player
Important note about priority: Show for takes priority over Hide from.
Make a Block of Text Private
Private blocks of texts can be added to posts using the toolbar buttons  .
.

Private blocks can be seen by:
- The post author
- Anyone else with edit rights to the post (Game leaders, staff)
- Anyone whose username is fully spelled out in the "Shown for" block. You can separate multiple users with commas. White space around names is ignored, but white space within names has to be respected.
Private-from blocks are the same except they exclude anyone whose name is fully spelled out in the "Hidden from" block.
The content of both private and private-from blocks are specifically removed from the search index contents and email notification contents, regardless of whether the person doing the searching or receiving the email would normally be able to see the contents of the private/private-from block. This is because both search and email do not have a user-specific context; for example, the same email body is generated once and mailed to all users who are following the content.
Both private and private-form blocks should allow any type of formatted content within the block.
User Abilities
Originally write up by @Butchern
Ignore Feature
- If you no longer wish to see content from a particular user, use the Ignore feature. There are four ways to access the Ignore feature:
- Hover over the username of the user you wish to ignore, and an in-context menu will appear. In the bottom right of that menu is the "Ignore" link.
- Click on your own username in the top right of the header for the site. On the drop-down, click "Ignored Users."
- Log in and visit the link: https://test.myth-weavers.com/index.php?/ignore/
- On mobile, click the three horizontal lines in the top right of the page, then Account, then Ignored Users.
Ignoring Users
Once you are on the "Ignored Users" page, you can enter usernames into the "Add new user to ignore list" box. If you reached this page from clicking the "ignore" link on a user post, the box will be autopopulated. You can then select what it is you would like to ignore: Posts, Messages, and/or Mentions. Check all that apply and then click "Add User."
Beneath the input box on the “Ignored Users” page is a list of all the users you have ignored. By clicking on the cog beside the name of an ignored user, you can change the ignored content or unignore someone entirely.
Changing Content View Behavior
When you view a Topic (thread), you can have Myth-Weavers take you to the posts you haven't read (the default setting), take you to the beginning of the Topic, or take you to the latest comment. To change the content view behavior click on your username in the top right corner of any page. Click Account Settings on the drop-down to go to your settings page. Then click Content View Behavior on the left sidebar. Make your change and click Save.

Note: This is a living and incomplete document. It will be updated and expanded upon based on member questions.


Recommended Comments
There are no comments to display.